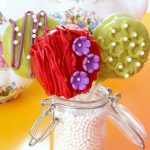
Little Mermaid Oreo Cookie Pops
Little Mermaid Oreo Pops are perfect for any kid's theme or birthday party, play dates, and special occasions. No special molds or equipment needed.
Ingredients
- 16 Oreo cookies , double stuffed
- 16 pkg lollipop sticks
- 1 bag light green melting wafers
- 1 bag red melting wafers
- 1 bag light purple melting wafers
- assorted decorating candies and Wilton brand cake decorating flowers
- 16 treat bags , sandwich bags, or snack bags (optional)
- 16 twist ties , pipe cleaners, or ribbon (optional)
Instructions
- Melt the wafers in the microwave according to the package instructions. I use 50% power for 1 minute. I then stir and add an additional 30 seconds if necessary. You want to avoid overheating the chocolate (making it too hot), as this will cause it to seize up and there is no coming back from that - it winds up in the trash. It is okay to warm it more than once but be mindful not to overheat it.
- Start by securing the pop stick inside the cookie with some extra melting chocolate. I happened to have some extra white so I used that - but you can use any color you have melted for your project.
- Place the lid back on the cookie and gently press it together and allow it to cool. This takes only a couple minutes but if you want to speed the process along, you can put them in the freezer or the fridge for a few minutes.
- After the stick is secure, dip the cookies in your base color. I don't use a fancy mold or anything, I just dip the cookie into the melting chocolate, shake off any excess, and then spread it evenly with a small cake spatula or butter knife (table knife) to get an even coating.
- Lay the cookies down onto a parchment or wax paper-lined cookie sheet or baking tray and allow them to set. If you are adding candies directly to this layer of chocolate, add them now and gently push them down into the chocolate, if necessary, to secure them. You only have a couple of minutes for this step so have them at the ready.
- Allow this layer to cool completely before adding the next layer of chocolate if you want it to stand out off the top of the cookie. If you want to swirl colors, add the second color while the first coat is still warm and swirl with a toothpick. I did this with our Frozen themed cookies to look like snow flurries.
- I piped my second color layer with warned chocolate I put into a zip-top bag. I worked it to one corner of the bag and then snipped a small hole to pipe. If you have the cake decorating accessories and wish to use those, you can but no special equipment is really needed for these whimsical cookies.
- Add candies to this layer before it sets; about 2-5 minutes.
- Display them for the party or bag them up with a treat wrapper or a fold-over style sandwich bag and secure with a twist tie, piece or ribbon or pipe cleaner. You can even use a snack size zip-top bag and put the entire cookie and stick inside. It's totally up to you!
- The kids are sure to absolutely adore them no matter how you present them so just have fun!